(Generating random & secure Earthcoin address.)
Welcome! Let's print out a beautiful and secure wallet for your Earthcoin.
Here's an overview of what will happen, step by step.Sample:


Before printing out a wallet you'll need to "calibrate" your output using the zoom and horizontal shift adjustments to accommodate your particular browser / printer combination. Without proper callibration, your wallet may print out too small or with a misaligned reverse side.
Step 2: Print Front
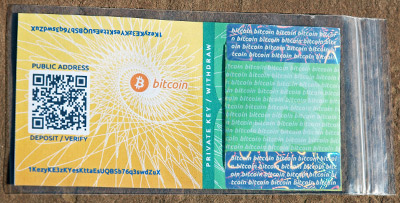
Next we'll print out the front side of your wallet. A public address and private key will automatically be generated, or you can supply your own key if you are using 'vanitygen' or some other random key generator.
Step 3: Print Back
Then you will put the same page back in your printer (but flipped over) to print out the back side of your wallet. This isn't just for good looks: the back side design includes additional tamper-resistant safeguards.
Step 4: Cut, Fold, Seal & Fund
Find your scissors! The final step is to cut out your wallet, fold it, and seal it with opaque (light-blocking) tape. Now you're ready to transfer bitcoins from your online holdings to your new wallet.
Old Style Paperwallet
Maybe you prefer to use the classic paper wallet or generate many addresses. Then use this.
To calibrate your output, print out this page in LANDSCAPE (wide) format. Based on the results, adjust the "zoom" and "horizontal shift" until your printed ruler approximates a real ruler, and leaves equal margins on the left and right sides of the page. Consider letting us know what settings worked best.
Print Calibration TestZoom / Shift : Default

Reload the front page into your printer first. And don't forget to print in LANDSCAPE mode!
Print Wallet Back
How to cut & fold your 2-sided wallet:
Cut out your wallet (use the dotted lines on the front as a guide, not the back!)Now fold the more narrow private key area in half, and then over again as indicated by the dotted lines in this diagram:
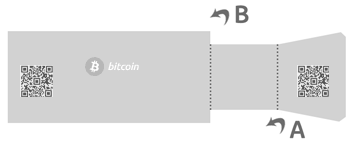
The final wallet will be a rectangle shape with the more narrow private key area folded over it, like this:
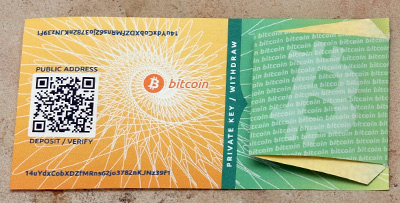
Finally seal your wallet by placing two strips of sturdy light-blocking tape over the top and bottom edges of the private (folded) area. A zip-seal bag will keep it safe from moisture (especially important for inkjet prints.)